
Cat Eye Nails: The Magnetic Manicure Trend Canadians Can’t Stop Staring At
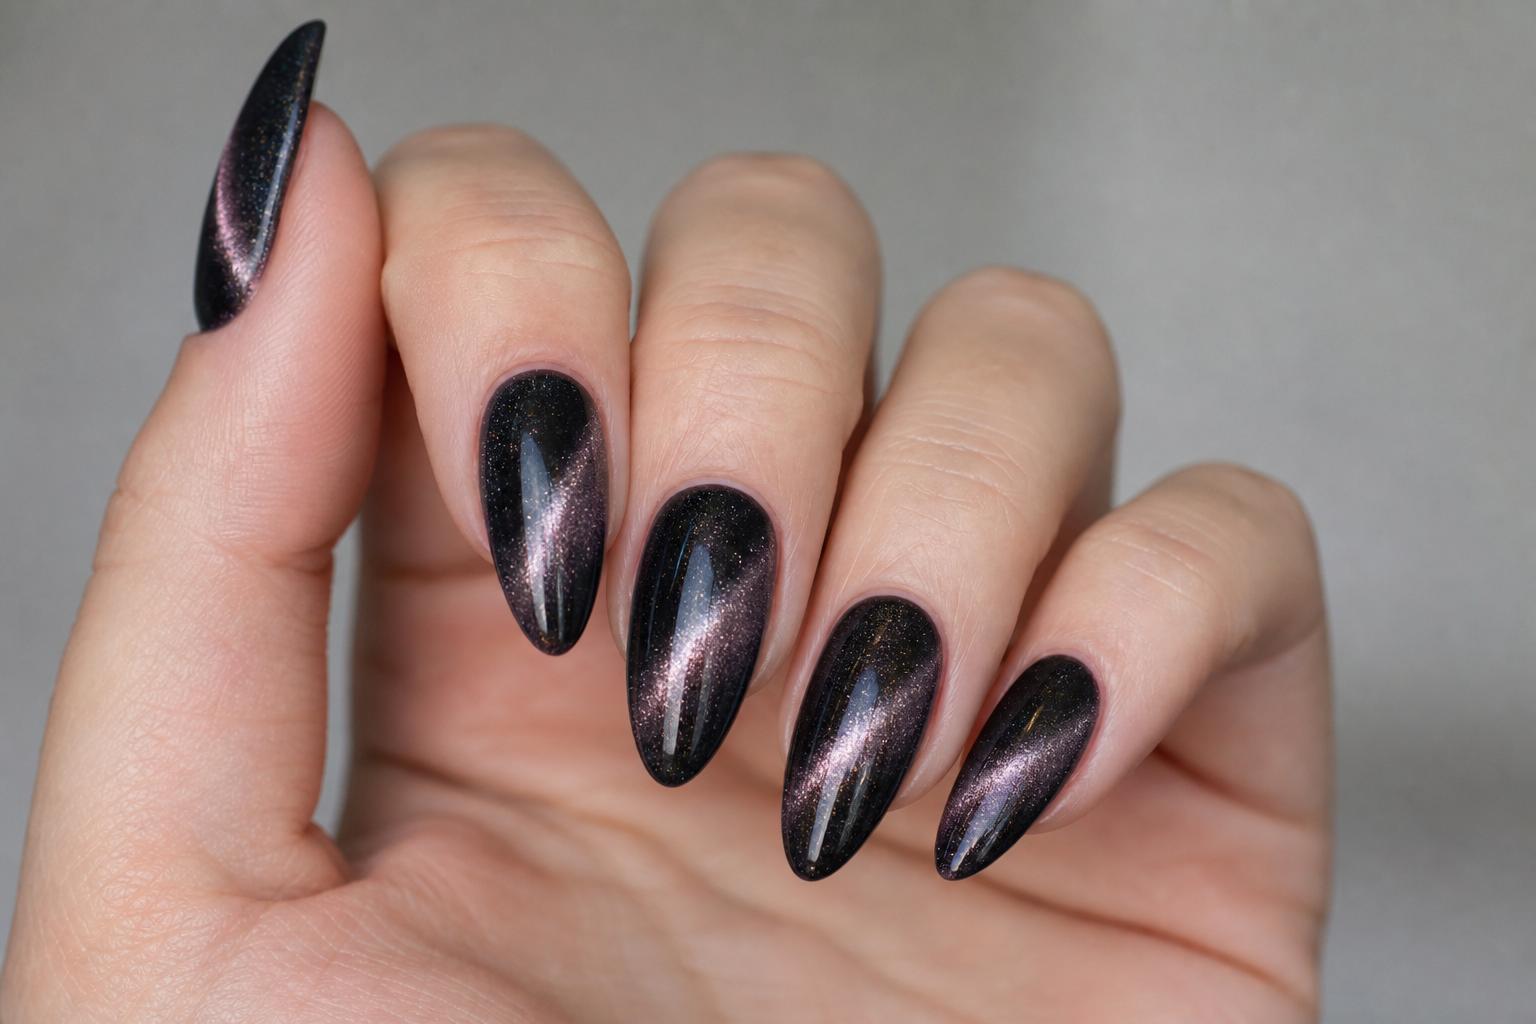
Catch a flash of light across a fingertip and your brain does a double take. Is that a ribbon of starlight trapped under glass? That hypnotic shimmer you can “move” with a magnet is the signature of cat eye nails, and they’re everywhere from Kensington Market coffee counters to Calgary brunch tables. If you’ve been wondering how the effect works, whether it damages nails, what it costs in Canada, and how to get the look at home without turning your cuticles into a crime scene, you’re in the right place. You’ll find the science behind the sparkle, step-by-step techniques, design ideas for Canadian seasons, cost breakdowns in CAD, safety notes that actually matter, and practical tips that pros use to make those lines crisp and luminous.
What Exactly Are Cat Eye Nails?
Cat eye nails are a type of nail art created with magnetic gel polish. In the bottle, the polish looks like regular gel—until you hold a magnet over it. Inside the gel are tiny reflective particles (often iron-based) suspended in a coloured base. When you bring a magnet near the uncured gel, those particles line up along the magnet’s field lines. That alignment creates a bright, moving “stripe” or halo that shifts with the light, like the slit pupil of a cat or a gleam across a gemstone. Cure the gel under a UV/LED lamp, and the pattern freezes in place.
The effect can be soft and “velvety” or bold and linear, depending on the pigment and magnet you use. Classic cat eye nails use a single bright line on a deep base. Newer formulas—often labeled 3D, 5D, or 9D—mix multiple interference pigments so the colour flips as you move your hand. Think aurora borealis trapped on your thumbnail.
Why Cat Eye Nails Took Off in Canada
They look luxe without screaming for attention. That’s a sweet spot for Canadian style. In a downtown Toronto law office, a charcoal cat eye manicure reads professional, but catch it in the elevator and it glows. The effect also plays well with winter, when short days and holiday lights make shimmer feel seasonal rather than showy. In Vancouver and Halifax, where grey skies are common, a galaxy design adds a little drama on a Tuesday.
Practicality matters, too. Cat eye nails are created with gel, so they last two to four weeks for most people. You can go out in gloves, shovel a bit, tap on a keyboard, and still have that ribbon of light intact the next weekend. The look has also spread fast on social platforms; short videos showing a magnet “pulling” light across the nail are instantly satisfying, which made the trend click with Canadian tech-savvy salon goers and home hobbyists alike.
Types of Cat Eye Finishes and Effects
Not all magnetic gels behave the same way. Understanding the differences helps you pick a finish that suits your style and nail length.
Classic Single-Line Cat Eye
This is the OG: a single bright line across a darker base. It’s precise and elegant. A black base makes the stripe pop, but deep emerald, navy, and burgundy are also strong choices for office-friendly drama in places like Ottawa or Mississauga.
Velvet Cat Eye
Instead of one defined line, the entire surface looks like brushed velvet or mink. Move your hand, and the sheen ripples. It’s softer and flattering on shorter nails, great for those in healthcare or hospitality across Canada who need to keep length modest but still want sheen.
Galaxy or Nebula
Multiple movement points create a star field. Designers often layer a jelly tint or chrome powder under or over the magnetic layer to add depth. On a December night in Montreal, these sparkle like fresh snow under streetlights on Saint-Laurent.
Halo Cat Eye
A glowing ring sits near the cuticle or edge, like a lunar eclipse. Subtle, modern, and perfect for minimalist lovers in Victoria or Winnipeg who want something beyond a solid colour.
French Cat Eye
Combine a sheer or neutral base with a magnetic tip. The result is a futuristic French manicure that works surprisingly well for business meetings in Calgary yet looks party-ready in Vancouver’s Yaletown after hours.
3D/5D/9D Formulas
Those labels aren’t scientific—they’re marketing shorthand for how many colour-shifting pigments are packed in. 9D cat eye polishes often flip between two or more hues, so a teal line might flash magenta at another angle. If you like maximum movement with minimal nail art fuss, these are worth the splurge.
What You Need: Tools, Products, and Typical Canadian Prices
You don’t need a full salon to start. A compact kit covers the basics. Here’s what’s essential, plus ballpark prices in CAD as of this year (prices vary by city and brand).
Core Products
- Cat eye gel polish: $15–$30 per bottle. Start with a black, a deep neutral, and one 5D/9D shade for drama.
- Base coat (gel): $10–$20. Promotes adhesion and protects the nail plate.
- Top coat (gel): $10–$25. Choose a no-wipe top coat if you don’t want to cleanse off a sticky layer after curing.
- Opaque base colour: $10–$20. Black intensifies the effect, but deep blues, greens, and purples are beautiful too.
Magnets
- Bar magnet: $5–$15. Creates straight lines and diagonal slashes.
- Round or “paddle” magnet: $8–$18. Pulls pigment into halos or “cat iris” shapes.
- Magnetic pen/dotting magnet: $10–$20. For tiny swirls or pinpoint stars.
UV/LED Lamp
Expect $30–$150 for a solid lamp. Ensure it cures your brand’s gels properly (365–405 nm is common). Many Canadian DIYers pick compact LED lamps for small desk spaces. If you’re investing, a mid-range 48W to 72W lamp that supports both UV and LED-initialized hardening cuts cure times and improves durability—assuming it matches the chemistry of your gel system.
Prep and Removal
- Nail file and buffer: $5–$15.
- Cuticle pusher and nippers: $10–$30 (keep them sharp and sanitized).
- Alcohol or cleanser: $5–$12.
- Acetone (for soak-off): $6–$15, plus foil or reusable clips and cotton pads.
Responsible purchasing tip: In Canada, nail products are classified as cosmetics under the Food and Drugs Act. Reputable products list ingredients, contact info, and a batch code. If you’re curious about ingredient restrictions, Health Canada’s Cosmetic Ingredient Hotlist outlines substances that are restricted or not permitted in cosmetics. When in doubt, check the ingredient list and ask the seller for an SDS (Safety Data Sheet) if you want extra reassurance.
How to Do Cat Eye Nails at Home: A Clear, Reliable Method
This process assumes you’re using soak-off gel polish. Adjust cure times based on your lamp and product instructions.
Prep: The Boring Part That Makes or Breaks It
- Wash and dry hands thoroughly. Oil on the nail plate ruins adhesion.
- Push back cuticles carefully. Remove only dead tissue. Aggressive cutting invites lifting and infection.
- Lightly buff the shine off the nail surface with a fine buffer. You want a velvet-matte look, not grooves.
- Dehydrate the nail with isopropyl alcohol. If you use a primer, apply sparingly.
Base Layer: Insurance Against Peeling
- Apply a thin base coat, capping the free edge.
- Cure fully. Shortcuts here often lead to lifting.
Colour Backdrop: Make the Magnet Pop
- Apply an opaque base colour (black is the classic). Keep coats thin to avoid heat spikes and wrinkling.
- Cure after each layer. Two thin coats beat one thick one, always.
Magnetic Layer: Where the Magic Happens
- Apply your cat eye gel thinly and evenly. Don’t cure yet.
- Hold the magnet 3–5 mm above the nail—never touching the gel. For a straight line, use the bar magnet parallel to your target line. For a halo, hover a round magnet near the centre, then tip it slightly to shape the glow.
- Move slowly. Watch the pigment gather. If you overdo it, you can gently brush to reset and try again before curing.
- Flash cure for 5–10 seconds to lock the pattern, then fully cure as directed.
Second Magnetic Coat (Optional but Spectacular)
For depth, add a second thin coat of cat eye gel and repeat the magnet step. This creates a layered glow that looks expensive. Flash cure, then full cure.
Top Coat: Seal Without Smearing the Effect
- Float on a top coat with a light touch to avoid disturbing the line. If your product tends to drag, fully cure the colour first and let the nail cool a few seconds before top coating.
- Cure. If it’s not a no-wipe top, cleanse the tacky layer.
Advanced Tricks Pros Use
- Magnet from below: Rest the nail over a small stand and bring the magnet under the free edge for unique curves you can’t get from above.
- Freeze lines: Flash cure after shaping on each nail to prevent the gel from self-leveling and softening the line while you work on other fingers.
- Multimagnet layers: Use a bar magnet for a diagonal slash, flash cure, then a round magnet on a second coat for a halo—galaxy in two moves.
- Jelly tint overlay: Brush a sheer tinted gel over the cured cat eye, then another cat eye coat. It’s like adding a coloured lens to the effect.
Short Nails vs Long Nails
Short nails benefit from slimmer lines placed off-centre; it elongates the look. Long almond or coffin shapes can handle bolder S-curves and multi-point stars. If you type all day in a Toronto startup, keep the line subtle and close to the centre to minimize visual wear at the tip.
What a Salon Appointment Looks Like in Canada
Walk into a good salon in Vancouver’s Kitsilano or Montreal’s Plateau and the process will feel familiar if you’ve had gel before. You’ll consult on shape, length, and finish. If you bring a photo, mention what you like: the tight line, the soft velvet, the colour flip. Your tech will often swatch a couple shades under a lamp so you can see the effect live.
Timing varies. A gel cat eye manicure on natural nails runs 45–75 minutes. With extensions, 1.5–2.5 hours depending on art complexity. Salons commonly book fills at two to three weeks.
Typical Prices (CAD), By City and Service
- Gel manicure with cat eye effect (no extensions): $55–$85 in Toronto and Vancouver; $45–$75 in Winnipeg and Halifax; $50–$80 in Calgary and Ottawa.
- Hard gel or acrylic extensions with cat eye: $90–$150 in larger cities; $80–$130 in mid-size markets.
- Fill with cat eye refresh: $60–$90 depending on design time.
- Removal only: $15–$30 (often waived if you’re getting a new set at the same salon).
Gratuity norms in Canada are typically 15–20% on the pre-tax service total. Many salons in Quebec and Ontario now accept Interac debit, credit, and tap-to-pay; check ahead if you prefer cashless. In bilingual Montreal, you’ll be fine in English in most central salons, but knowing “gel,” “pousser cuticules,” and “paillettes” won’t hurt.
Design Ideas for Canadian Seasons and Moments
Winter: Northern Lights on Your Hands
Start with a black or navy base, add a 9D teal-to-purple cat eye, and finish with a faint aurora green jelly. It reads “Arctic night” without needing snowflake stickers. For holiday dinners across the Prairies, try a velvet cat eye in deep cranberry with a single accent nail in gold halo.
Spring: Subtle Bloom
Use a sheer pink base and create a French cat eye tip in soft lilac. It’s fresh for cherry blossom walks in Vancouver or High Park in Toronto. Add tiny hand-painted white dots at the smile line for a petal effect without going full floral.
Summer: Lake Glass and Sun Flares
Over a sea-glass green base, create a diagonal cat eye line in champagne. It sparkles in Muskoka sun and looks equally good wrapped around an iced coffee on Commercial Drive. For Canada Day, go minimalist: pale nude base with a thin red cat eye swoop on ring fingers, plus a tiny maple leaf decal if you’re feeling festive.
Autumn: Cabin Glow
Burnt orange jelly, charcoal base, and a copper cat eye make “bonfire at the cottage” nails. In Montreal’s Mile End, pair a velvet cat eye in forest green with matte top coat on two nails for texture contrast.
Work, Weddings, and Weekends
For conservative offices, a taupe base with a champagne velvet cat eye is polished and safe for client meetings. Brides in Whistler love a milky sheer base with a silver halo at the cuticle—ethereal in photos. Weekend festival in Calgary? Layer a neon jelly over a 5D cat eye and add a micro-foil flake near the line for a tiny comet.
Durability, Maintenance, and Real-World Wear
On natural nails, cat eye gel manicures last 2–3 weeks for most people. On extensions or overlays, 3–4 weeks is normal. Heavy typing, cleaning without gloves, or frequent hand sanitizer use (hello, Canadian winter) shortens life. That line you worked so hard on won’t “move” once cured, but the illusion changes as the top coat dulls; a quick wipe with alcohol or a thin layer of gel top in week two can refresh the shine if your system allows it.
Daily maintenance is basic: cuticle oil morning and night to fight winter dryness; gloves for dishes and snow shoveling; keep a glass file in your bag to smooth any tiny snags. If a corner lifts, don’t pick. Tape it down with a fabric bandage and book a fix. Picking causes layers of the nail to peel—leading to the “gel ruined my nails” myth, which is really a removal problem.
Safe Removal at Home or in a Salon
Soak-off gel comes off with acetone; hard gels require filing. If you’re unsure which you have, ask your salon before trying to remove it yourself.
Soak-Off Method
- File the shiny top coat to break the seal. Don’t dig into your natural nail.
- Saturate cotton with acetone, place on the nail, and wrap with foil or use reusable clips.
- Wait 10–15 minutes. In colder Canadian rooms, 20 minutes may be needed. Gentle warmth (not a heater) helps—wrap hands in a towel.
- Gently push off softened gel with a pusher. Rewrap stubborn spots.
- Buff lightly, cleanse, and apply cuticle oil.
Never pry or peel. For hard gel or acrylic beneath the cat eye layer, book a professional or use an e-file only if you’re trained. Overfiling causes heat spikes and thinning.
Safety, Allergies, and Canadian Regulations You Should Know
Most people wear cat eye nails without issues, but it’s smart to know the risks and mitigations—especially if you’re DIYing in a Canadian apartment with dry winter air and limited ventilation.
UV/LED Exposure
UV nail lamps emit UVA, which contributes to skin aging and, in high exposures, cancer risk. For context, manicure exposures are brief and intermittent, but simple precautions help: apply a broad-spectrum SPF 30+ to your hands 15–20 minutes before curing; wear fingerless UV-blocking gloves; and avoid unnecessary extra cure cycles. Using a lamp that matches your gel’s chemistry reduces re-cures and undercuring.
Acrylate Allergies
Gel systems contain acrylates and methacrylates. Sensitivities can develop, especially with repeated skin contact or undercured product. Signs include itching, redness around nails, or eyelid dermatitis. Avoid skin contact, wipe spills immediately, and cure fully. If you experience symptoms, stop using gels and consult a healthcare professional. Using the brand’s recommended lamp or one with compatible wavelength/power helps ensure full cure.
Ingredients and Oversight
In Canada, nail products are regulated as cosmetics. Companies must ensure safety and proper labeling, and they submit a Cosmetic Notification Form to Health Canada. The Cosmetic Ingredient Hotlist identifies substances that are restricted or not permitted. If you’re worried about specific monomers (for example, methyl methacrylate in liquid monomer systems), ask your salon what they use and check brand disclosures. Opting for reputable suppliers reduces risk.
Salon Hygiene and Provincial Practices
Public health guidelines for personal services vary by province but share core principles: proper disinfection of tools, hand hygiene, and single-use items for anything that can’t be disinfected. In Ontario, Public Health Ontario publishes best practices for personal service settings that many municipalities follow. In British Columbia, regional health authorities like Vancouver Coastal Health inspect salons. Alberta Health Services provides salon sanitation guidelines. Look for disinfectant products with a DIN (Drug Identification Number), which signals they’re approved for sale in Canada as disinfectants. Autoclaves are a plus, especially for metal tools. If a salon in Montreal or Edmonton shrugs at disinfecting between clients, choose another.
Pregnancy and Health Conditions
Pregnant clients commonly get gel manicures, but mention your pregnancy to your tech so they can minimize dust and fumes. If you have respiratory issues, ensure good ventilation during filing. Implanted medical devices and small manicure magnets are typically not a concern because magnets are weak and used far from the chest, but if you have a pacemaker or implanted defibrillator, follow your device manufacturer’s guidance and avoid placing magnets near the device. When in doubt, speak with your healthcare provider.
Sustainability and Low-Waste Habits
Gel products are small-volume, but mindful choices add up. Use reusable soak-off clips instead of foil for frequent removals. Don’t pour acetone down the drain—check your municipality’s hazardous waste guidelines (Toronto, Vancouver, Calgary, and most Canadian cities host drop-off days or depots). Choose long-wearing formulas to reduce repaint frequency. If cruelty-free or “10-free” claims matter to you, verify the brand’s certifications rather than taking marketing at face value; Canada doesn’t have a single government-run cruelty-free logo.
Troubleshooting: Fixes for Real Problems
My Line Blurs Before I Cure
Your gel is self-leveling too fast or the room is warm. Work one nail at a time, flash cure for 5–10 seconds right after shaping, and keep the bottle closed between nails to maintain viscosity.
The Pattern Shifts When I Apply Top Coat
Either your cat eye layer wasn’t fully cured, or you’re pressing too hard. Fully cure, let the nail cool a few seconds, then float the top coat. If needed, add a third thin cat eye layer to re-establish the line and seal again.
It Looks Flat on Camera
Cat eye needs directional light. Use your phone’s flashlight at an angle or stand near a window and tilt your hand until the line glows. Short video clips show the effect better than still photos.
I Can’t Get Symmetrical Lines on Both Hands
Common. Use guides: lightly draw a ghost line with a non-magnetic striper brush first, or mark a dot where you want the brightest point, then magnetize to that target. For your non-dominant hand, brace your wrists on the table and take breaks.
Premature Lifting
Usually prep-related: residual oils, touched skin, or thick coats. Dehydrate thoroughly, cap the free edge, and keep layers thin. In Canada’s dry winters, add a rubberized base gel for flexibility.
How to Photograph and Share Your Cat Eye Nails
Soft daylight near a window works wonders. Angle the light so it grazes the nail surface. If you’re posting on Instagram or TikTok, a short pan—hand still, camera moving—catches the colour flip. Background matters: a dark sweater or a coffee cup from your favourite Halifax café makes the glow pop. If you want a dramatic “before/after” in the same clip, record yourself waving the magnet over uncured gel (then cure out of frame) to show the transformation.
Compare Cat Eye Gel Types and Magnet Tools
| Type | Look | Skill Level | Pros | Cons | Best For |
|---|---|---|---|---|---|
| Classic cat eye gel | Single bright line on dark base | Beginner | Crisp, timeless, easy to control | Less multi-dimensional | Office wear, short nails |
| Velvet cat eye | Soft, brushed sheen | Beginner–Intermediate | Forgiving on application | Less defined line | Minimalist looks, quick sets |
| 5D/9D cat eye | Multi-colour shift, deep effect | Intermediate | High impact, photogenic | Costlier, can overwhelm short nails | Events, statement nails |
| Bar magnet | Straight or diagonal lines | Beginner | Predictable results | Limited shapes | Classic designs |
| Round/paddle magnet | Halos, circular glow | Intermediate | Unique depth | Requires practice | Halo and galaxy effects |
| Magnetic pen | Pinpoint stars, micro-swirls | Advanced | Fine detail | Easy to overwork gel | Accent nails, pro finishes |
Budget Planner: DIY vs Salon in Canada
| Item/Service | DIY Cost (CAD) | Salon Cost (CAD) | Notes |
|---|---|---|---|
| UV/LED lamp | $50–$120 (one-time) | $0 | Match lamp to gel chemistry |
| Cat eye gel polish | $15–$30 per bottle | $0 | One bottle yields many sets |
| Base + top coat | $20–$45 | $0 | Replace every few months if used often |
| Magnets | $10–$35 | $0 | Bar + round cover most looks |
| Gel cat eye manicure | $2–$4 in consumables | $55–$85 per visit | Excludes tip; includes pro skill |
| Extensions + cat eye | — | $90–$150 | Fill every 2–3 weeks |
| Removal | $6–$15 supplies | $15–$30 | Often discounted with new set |
If you love changing designs every two to three weeks, a DIY setup pays for itself quickly. If you prefer perfect shaping, complex nail art, or long extensions, the salon premium buys time and expertise—worth it for many in busy cities like Toronto and Vancouver.
Who Should—and Shouldn’t—Choose Cat Eye Nails
Cat eye nails are versatile, but they’re still gel. If your job in a Hamilton hospital requires frequent glove changes, opt for short length and a velvet effect that hides tip wear. Climbers, mechanics, or anyone hard on their hands may prefer overlays or short naturals to prevent breaks. Teens can wear them, but teach proper removal to protect fragile nails. If you’ve had reactions to gel before, patch testing with a pro and limiting skin contact are non-negotiable. For very brittle nails, consider a strengthening base or a light builder gel overlay under the cat eye layer for support.
Alternatives If You Can’t Use Gel
Traditional magnetic nail polishes (air-dry) exist, though their durability trails gel. They’re a good option if you’re avoiding UV lamps. Press-on nails with cat eye finishes are another route—quick for events and removable without acetone. Nail wraps offer printed versions of the effect, but they lack the dimensional movement real magnetic pigments create. If you’re sensitive to acrylates, discuss options with a dermatologist; many press-on adhesives are also acrylate-based, so read labels carefully.
Pro Design Recipes You Can Recreate
Subtle Office S-Curve
Base: deep taupe. Cat eye: champagne. Use a bar magnet to create a gentle S starting near one sidewall and ending near the opposite tip. One thin layer is enough. It’s quiet until sunlight hits your streetcar window in Toronto.
Prairie Sunset
Base: warm nude. Cat eye: copper 5D. Add a pale coral jelly overlay after curing the cat eye to soften the metallic. Top with a glossy no-wipe. It glows like late light over the fields driving outside Regina.
Whistler Ice
Base: sheer milky white. Cat eye: silver velvet. Add a faint ice-blue tint along the cuticle and cure. Finish with a matte top on index and pinky for contrast, glossy on middle and ring for the “ice” effect.
Halifax Night Tide
Base: navy. Cat eye: teal 9D, shaped into a crescent near the sidewall to mimic a moonlit wave. Add a micro silver flake where the crescent peaks—one per hand, not ten. Elegance lives in restraint.
Storage, Care, and Kit Maintenance
Keep gels upright, capped tightly, and away from sunlight. A single afternoon of direct sun can thicken or partially cure a bottle. Wipe necks with alcohol before closing to protect seals. Store magnets away from hotel key cards and transit passes—they can demagnetize stripes. Clean brushes with your system’s cleanser or a tiny touch of fresh gel and a wipe; acetone can dry bristles. Replace files and buffers regularly; dull tools encourage overfiling.
Common Myths About Cat Eye Nails—Debunked
“Magnets are dangerous.” The small magnets used for nail art are weak and used briefly. You’re not sticking them to your chest, and they’re unlikely to affect consumer electronics beyond old-style magnetic stripes. Sensible handling is enough.
“Gel always ruins nails.” Poor removal ruins nails. Well-prepped, properly cured, and patiently removed gel protects many people’s nails, especially in dry Canadian winters.
“You can only do cat eye on black.” Dark bases intensify the effect, but sheer nudes, pastels, and even white can look chic with velvet cat eye gels. The trick is keeping lines delicate and placement thoughtful.
What Pros Check That Beginners Miss
They watch for undercuring. A too-thick magnetic layer looks rich but may wrinkle or undercure, leading to allergies and lifting. They also anchor lines where the eye wants to look: off-centre, following the nail’s curve, not cutting the finger visually. And they keep their hands clean—literally. Any gel on the skin gets wiped before curing. That tiny habit pays dividends in wear and health.
When Your Cat Eye Manicure Shouldn’t Wait
See a professional promptly if you notice greenish discolouration under enhancements (possible bacterial growth), persistent pain, or sudden swelling. Remove product and let the nail breathe if you suspect infection. Canadian pharmacies carry antiseptics, but avoid self-treating nail infections without guidance; a quick clinic visit brings peace of mind.
Putting It All Together: A Canadian Cat Eye Capsule
With a few bottles, two magnets, and a lamp, you can create a wardrobe of cat eye nails that fit your life—boardrooms in Bay Street towers, bike lanes along the Lachine Canal, snowy walks through Queen Elizabeth Park. Start simple: base, dark colour, one cat eye layer, cure, top. Then play. Add a halo. Try a jelly tint. Switch seasons with a quick colour flip. Keep it healthy by prep, thin layers, full cures, and patient removal. You’ll get the hang of the line—then you’ll start seeing light differently, noticing how a diner lamp in Saskatoon changes your nails, or how Calgary’s bright winter sun makes your tips look lit from within.
FAQ: Cat Eye Nails in Canada
What are cat eye nails, in simple terms?
They’re gel manicures made with magnetic polish. A magnet pulls reflective particles into a bright stripe or sheen, then the pattern is cured under a UV/LED lamp so it stays put.
Do cat eye nails work on short nails?
Yes. Use a slim, off-centre line or a velvet finish for the best look on short nails. The effect can actually make short nails appear longer.
How long do cat eye gel nails last?
About 2–3 weeks on natural nails and 3–4 weeks on overlays or extensions, depending on your activities and aftercare.
How much do they cost in Canada?
Expect $55–$85 for a gel cat eye manicure in larger cities, more with extensions ($90–$150). Prices vary by salon and complexity.
Is the UV lamp safe?
Exposure is brief, but UVA adds up over time. Minimize risk by applying broad-spectrum SPF 30+ beforehand, wearing UV gloves, and using proper cure times with a compatible lamp.
Can I do cat eye nails without a UV lamp?
You can use traditional magnetic air-dry polishes for a shorter-wear version. For the long-lasting gel look, a UV/LED lamp is required to cure the product.
What’s the difference between 3D, 5D, and 9D cat eye?
They refer to the complexity and number of colour-shifting pigments. 9D usually shifts across more colours and looks deeper and more dynamic.
Do I have to use a black base?
No. Black exaggerates the contrast, but deep colours, milky whites, and sheer nudes can look fantastic—especially with velvet cat eye gels.
Are cat eye nails safe during pregnancy?
Many pregnant clients get gel manicures. Ensure good ventilation, avoid skin contact with uncured gel, and keep appointments comfortable. If you have specific concerns, consult your healthcare provider.
Will the magnet harm my phone or credit cards?
The small magnets used for nails are weak. They won’t affect your phone, but keep them away from old-style magnetic stripe cards and hotel keys to be safe.
How do I remove cat eye gel at home?
File off the top coat, soak with acetone using cotton and foil or clips for 10–20 minutes, then gently push off softened gel. Never peel. Hard gels need filing and are best removed by a pro.
Why does my line disappear when I cure?
It’s self-leveling or you bumped the nail. Flash cure for a few seconds right after shaping the line, then do a full cure.
Can I combine cat eye with other nail art?
Absolutely. It pairs well with French tips, chrome powders, foils, stamping, and delicate linework. The key is restraint—let the magnetic effect be the star.
Are there Canadian regulations for nail products?
Yes. Nail products are regulated as cosmetics. Health Canada oversees labeling and safety via the Food and Drugs Act and the Cosmetic Ingredient Hotlist, which identifies restricted and not permitted ingredients. Reputable brands disclose ingredients and contact info.
What top coat should I use?
A no-wipe gel top coat is convenient and glossy. Make sure it’s compatible with your system and cure it fully for maximum shine.
How do I make the effect look stronger?
Use a darker base, thinner magnetic layers (two instead of one thick), and bring the magnet closer without touching. Multiple magnetic passes with flash cures between can add depth.
Can I get cat eye nails on acrylic or hard gel extensions?
Yes. The cat eye layer sits on top of the extension structure. It wears well and is easy to refresh at fills.
What if I develop redness or itch around my nails?
Stop using gels and consult a healthcare professional. You may be reacting to acrylates, often due to skin contact or undercured product. Switching systems doesn’t help if the technique remains the same—avoiding skin contact and ensuring full cure matter most.